Overview

Here at PipeLion we have done our best to simplify the setup process as much as we possibly can. Our Goal is to make this process as quick and painless as it can be. On average, you can expect this process to take around 15-30 minutes. This time range is largely dependent on the hold times for DonorPerfect’s customer support. 

You will need to have a PipeLion subscription plan, administrative access to your organizations DonorPerfect account, as well as administrative access to the WooCommerce store you wish to integrate. 

If you don’t have the required permissions please contact your administrator and ask them to give you the appropriate permissions. 

Alright, with all that said lets get your integration up and running! 

WooCommerce Setup

The first step in setting up your integration is creating two WooCommerce Webhooks and have it point to our PipeLion server. 

If this sounds scary don’t worry. It’s easy!

Configuring WooCommerce Webhook

Navigate to your WooCommerce store and log in as a WordPress admin.

Follow the steps below to configure your Webhook.

  • Click WooCommerce on the left panel of your Dashboard, then click ‘Settings.’
  • Click the ‘Advanced’ tab towards the top of the page.
  • Once in the Advanced tab click ‘Webhooks’ as shown below.
  • Then click add webhook to add the first webhook!

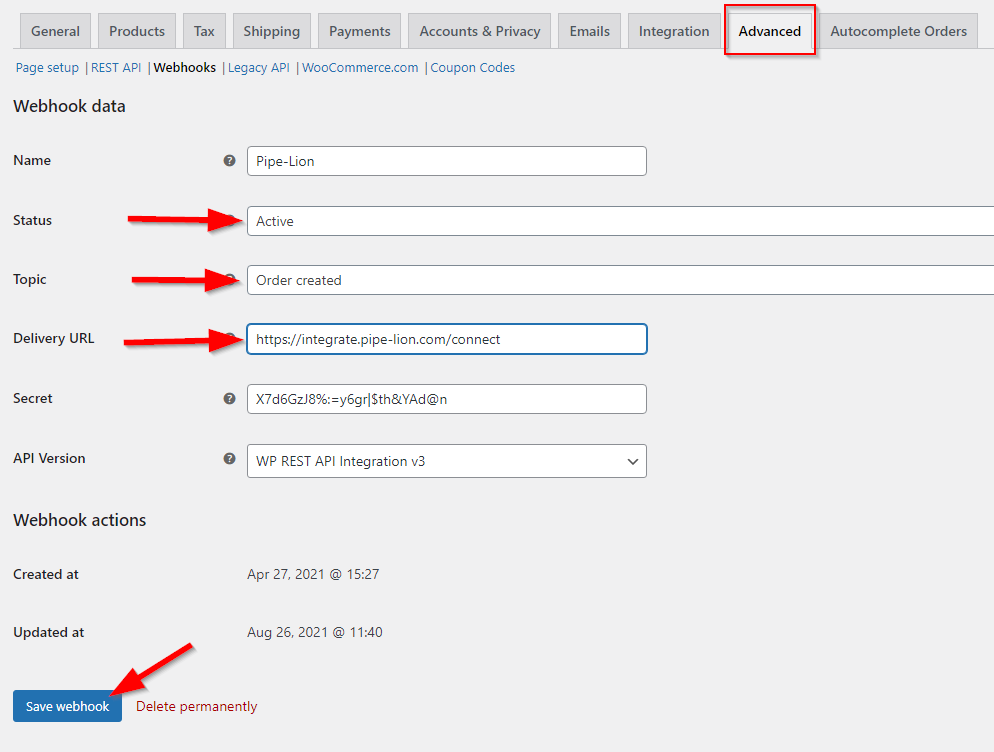
Now we just need to fill in the information.

  • Name: Fill this with anything you wish
  • Status: Active
  • Topic: Order Created
  • Delivery URL: https://integrate.pipe-lion.com/connect
  • Secret: Leave empty
  • API Version: Leave as Default
Click save and you are done!
 
Note: Do not worry if you see a warning stating, “Error: Delivery URL returned response code: 400.”
 
Now simply repeat those steps, but this time change topic to ‘Order Updated’.
 
 
This will allow your integration to update order statuses as well as any other changes that may be made after the initial creation of the order.
 
Save the second webhook and you are done!

DonorPerfect Setup

Next, we need to gather the following DonorPerfect information:

  • DonorPerfect API Key
  • DonorPerfect Field Codes

Acquiring DonorPerfect API Key

The next step in the process is going to be gathering or creating all the necessary DonorPerfect information for your integration to work properly.

The first thing we need to do is acquire a DonorPerfect API key if you don’t already have one (If you are switching from GiveCloud to WooCommerce you may already have one. It can be found in your Settings & Admin -> Integrations -> DonorPerfect -> API key of GiveCloud). These are assigned to each user, so the user you choose to have it assigned to must have permissions to add new donors, update existing donors, add and remove donor gifts.

If the user who owns the API key does not have the required permissions the integration will NOT WORK. 

It is best practice to create a new user with admin privileges that is specifically used for this integration. The reason for this is if you assign the key to one of your employee’s existing credentials and that user leaves your organization you would likely deactivate that account which would also deactivate the API key which would, in turn, deactivate the integration. 

To acquire your API key you will need to call DonorPerfect customer support and ask them to assign one to your desired user.  They may ask you what you are using it for. It is best to keep it vague stating something along the lines of “we are setting up a custom integration to import some of our data from a third party.”

Creating DonorPerfect Codes

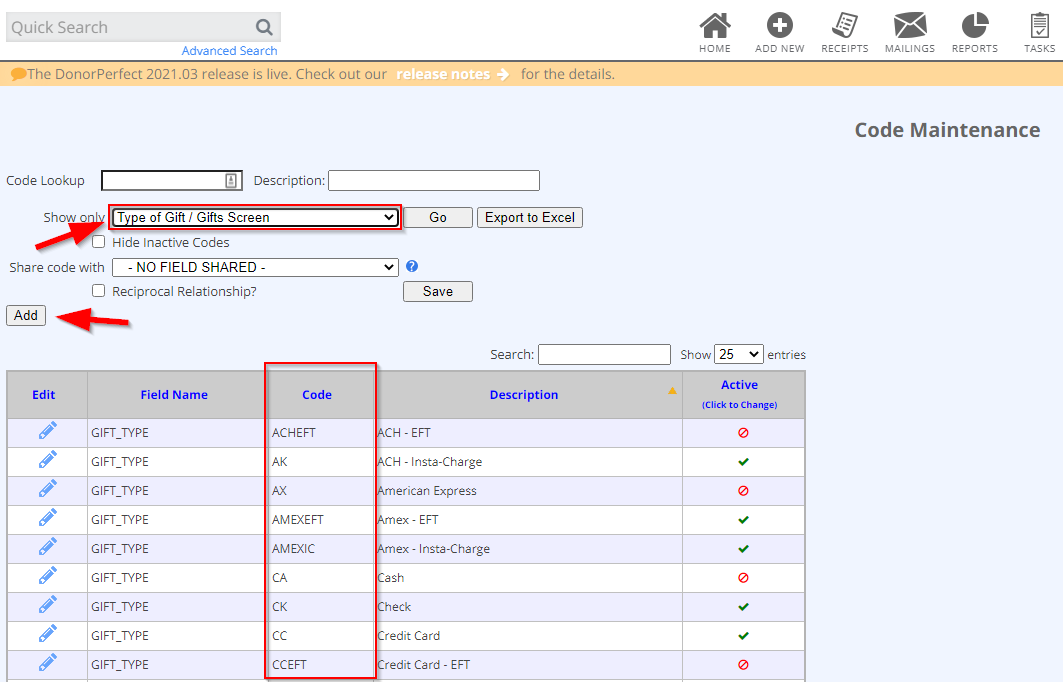
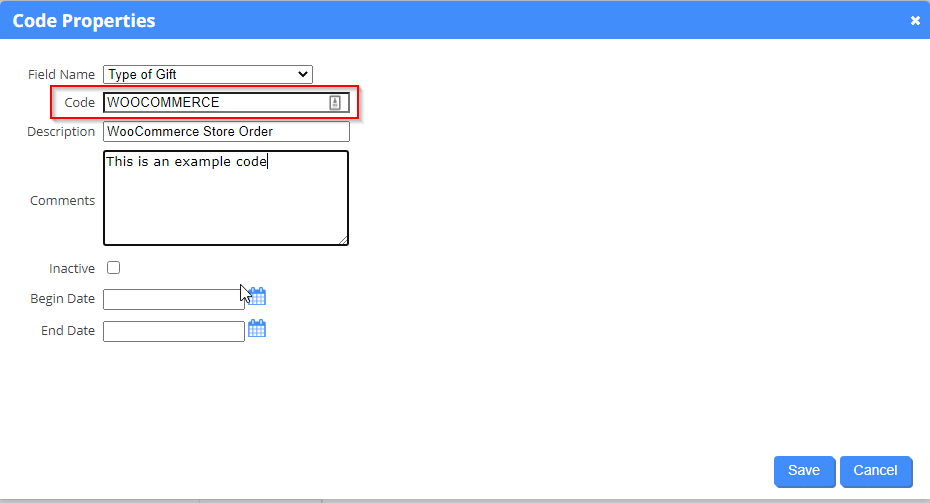
Now that you have your API key, we need to gather or create all the codes used in your DonorPerfect environment. 

You are going to need codes for the following fields:

  • Type of Gift (required)
  • General Ledger (optional)
  • Solicitation (optional)
  • Sub-Solicitation (optional)
  • Campaign (optional)
If you are not familiar with how to check existing codes or add new ones it can be found on the Code Maintenance page in your DonorPerfect settings.
 
We will walk through creating a code for the Type of Gift field as it is the only required code for the integration to function properly. 
 
  • Select the field you wish to add a code for, in our case “Type of Gift / Gifts Screen” then click ‘Go’.
 
 
You should now see all your existing codes for this field. If there is an existing one you wish to use you can simply copy that down for use in a later step. Otherwise, complete the steps below:
 
  • Click ‘Add’. Fill the code field with desired code. Fill description with desired description (this is how it will appear in Donor Perfect) then click ‘save’.
 
You may wish to complete the steps for each of the other four fields. This is however optional as Type of Gift is the only required code.  
 
Be sure to write down your code’s as we will need it in the next step!

PipeLion Configuration

To complete this step just need to be sure that you have the following information handy:

  • DonorPerfect API Key
  • DonorPerfect Codes
  • WooCommerce Store URL

PipeLion Settings Page

The first thing you need to do is navigate to PipeLion Integration Settings page.

Once there you will see a field that corresponds to each DonorPerfect code, your API key, and your site domain name.

  • Fill out each desired field with the appropriate information as shown below.

To attain your URL:

  • Navigate to your WordPress general settings.
  • Copy the WordPress Address (URL)
  • Paste it into your Integration  Settings
  • Be sure to add the final backslash. 

Note: You must be sure your URL has the backslash at the end or your Integration will not work! 

example:  https://pipe-lion.com/ 

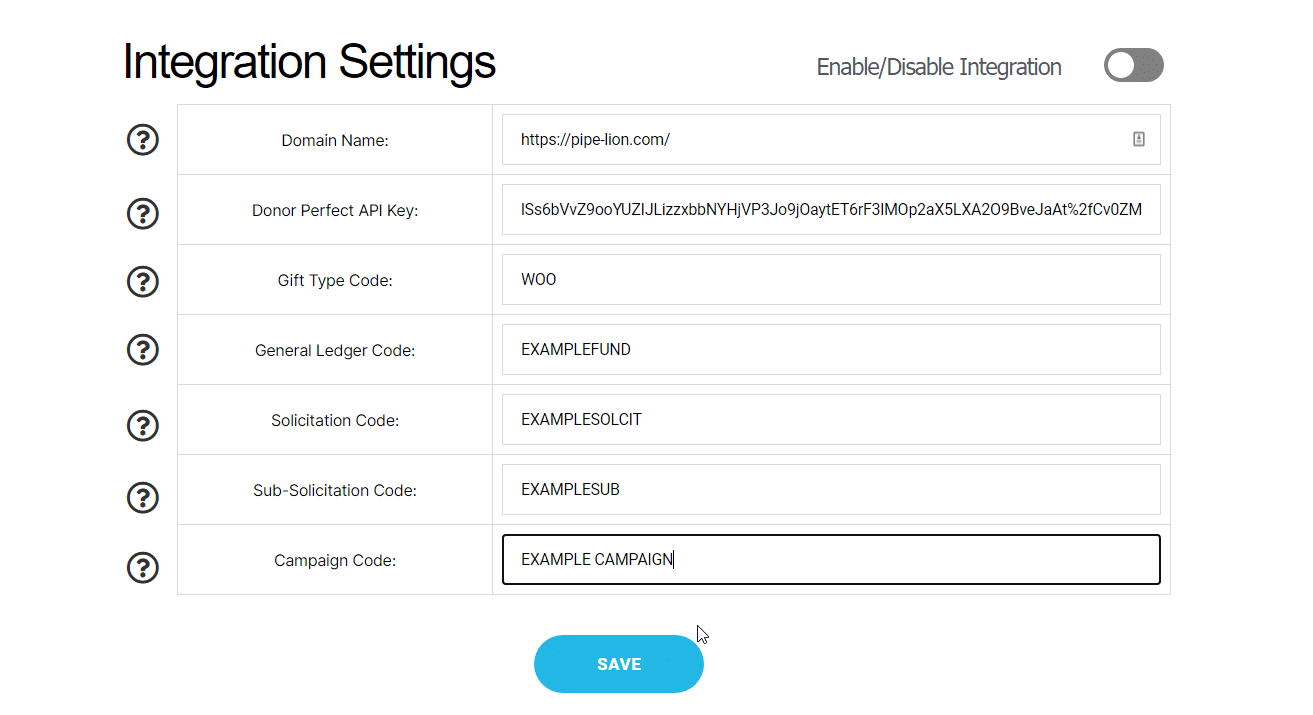
Note: The only required fields are domain name, DonorPerfect API Key, and Gift Type Code.

  •  Click ‘Save’.

Now that all the information is saved, the last step is to enable the integration. To do this:

  • Click Enable/Disable Integration

If you see a popup window stating “Your integration is active” your setup is complete!

You should now start to see any transactions ran through your WooCommerce store appear in your DonorPerfect environment as a split gift. 

Signup

Select Your Payment Cycle
Signup
    Strength: Very Weak
    Select Your Payment Gateway
    How you want to pay?
    Payment Summary

    Your currently selected plan is:
    Plan Price :

    This website uhses cookies to ensure you get the best experience on our website.